It has been a whirlwind of a week, so I have a few Easter crafts here, to finish them up in one post! The kids have been very busy, and are getting very excited for all the easter fun!
First we made easter egg gardens. I drew out a bunch of eggs on the back of some finger paint paper. We also used white wax crayons, glue, paint and a piece of green paper.
First the kids coloured with the white wax crayon on the front of the paper (the eggs were drawn on the back). Then they started painting over the crayon. I put the eggs on the back so the kids wouldn't see what they were doing, they just scribbled with the white crayon. And, they painted the whole page- on the front, so the eggs would have different colours!
After those dried, we cut out the eggs, and were surprised at all the different colours on each egg. After they were cut out, we glued them to the paper, and added some Easter stickers.
We also made handprint bunnies. We used finger paint, markers, and finger paint paper for this.
The kids painted one hand first.
After they dried, we drew the bunny around the hand print, added an Easter basket and then coloured some eggs, chocolate etc on the paper.
(The fingers are the ears, the palm is the face, and the thumb is the tail)
And today, we made toilet paper roll bunnies. We used toilet paper rolls, pink napkins (you can use any napkin), paint (you can use what ever colour, we used pink to match the napkins), glue and green paper, cut in a length of about 1.5 inches- including the "grass" cut at the top.
First we painted the toilet paper roll- to about 3/4 of the way up.
And then added the "grass" to the part that was not painted.
Then, with the napkins, we pushed them into the top of the toilet paper roll to make the ears.
We also glued on googly eyes, and when they are dry, we will use a marker to draw on the nose, mouth, and whiskers!
Showing posts with label Easter. Show all posts
Wednesday, April 4, 2012
Wednesday, March 28, 2012
EASTER!!!!
Yay! Another holiday is here. I love doing crafts with the kids, but really enjoy it when it is for a holiday! So, we were all very excited to get started on some Easter crafts this week.
I didn't have time to post yesterday, so there are two in this post.
The first one is a hatching chick. You can do this many ways, and with many different supplies, but this is what we used. A piece of finger paint paper cut in an egg shape. A piece of yellow construction paper cut in an egg shape as well (with a chick face drawn on it- because this will be the hatched chick!). Finger paint, glue, and markers.
We also used some paper fasteners too!
First the kids coloured the chick.
And then we finger painted the egg, using some Spring colours
After those dried, we cut the "egg", and glued the chick onto the bottom part of the egg.
Using the paper fasteners, we put the top and bottom of the egg back together, so it can open and shut.
TaDa, all the kids hatching eggs!
We first glued the yellow circles onto the paper. One on top of the other.
Then, we glued on the feet and the beak.
And added some feathers!
The kids used a marker to draw on the face of their chick.
And then we painted our hands to do the wings.
And then we have some hand print chicks!
I didn't have time to post yesterday, so there are two in this post.
The first one is a hatching chick. You can do this many ways, and with many different supplies, but this is what we used. A piece of finger paint paper cut in an egg shape. A piece of yellow construction paper cut in an egg shape as well (with a chick face drawn on it- because this will be the hatched chick!). Finger paint, glue, and markers.
We also used some paper fasteners too!
First the kids coloured the chick.
And then we finger painted the egg, using some Spring colours
After those dried, we cut the "egg", and glued the chick onto the bottom part of the egg.
Using the paper fasteners, we put the top and bottom of the egg back together, so it can open and shut.
TaDa, all the kids hatching eggs!
And then today, we made handprint chicks. These can be changed for many different "characters" in different seasons, just using different items and colours!
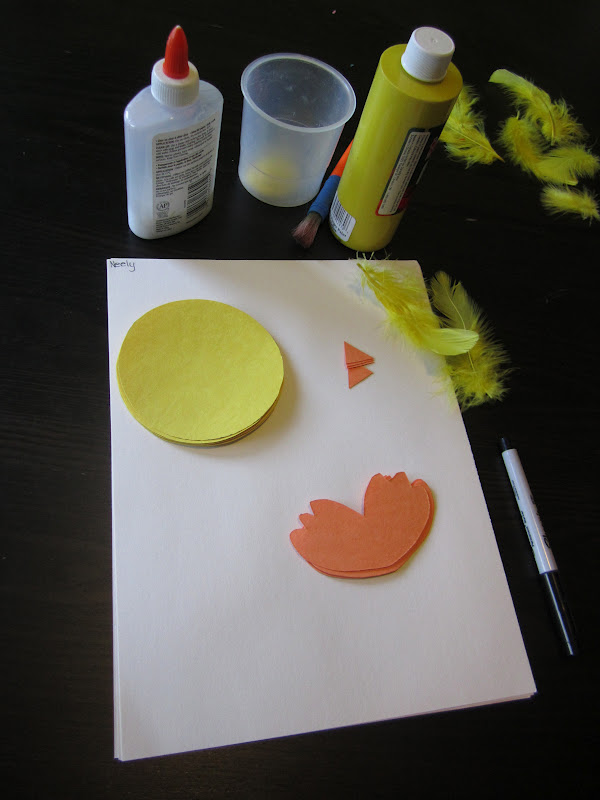
We used yellow construction paper cut into circles (each child will need 2). Orange construction paper cut into a triangle for a beak, and some feet for the chick. We also added some feathers. And you will need some yellow finger paint to do the wings. And also a piece of white paper to glue it all onto!
We first glued the yellow circles onto the paper. One on top of the other.
Then, we glued on the feet and the beak.
And added some feathers!
The kids used a marker to draw on the face of their chick.
And then we painted our hands to do the wings.
And then we have some hand print chicks!
Thursday, April 21, 2011
Easter basket
Easter baskets were today's craft! This is a multi-step activity, you can do it all at once, or spread out during the day.
First I got the papers ready. I cut half circles for the basket part- I cut these out of cardboard. Then I drew out the eggs and bunny to put in the basket. Then we cut strips of paper for the "basket" (weave). Older kids can help cut the strips. Also- with older children, you can show them how to "weave" the strips on their basket.
Then I gathered everything we needed. Besides the paper stuff that I already had together, I got pipe cleaners, markers, glitter glue, paint brushes, and the glue- which I colored with brown paint. I put the glue/paint in a bigger shallow dish.


I let the kid paint the glue/paint onto their baskets. And then start adding the paper strips (weave). You have to sort of hurry with this step, before the glue/paint dries.


After they put the strips on, we decorated it a little more with the glitter glue!
Then, they started coloring their bunny and eggs.

Then we cut them out, and glued them onto the basket. (You can also glue them to the back, so it looks like they are in the basket- but I made it simple for them to do!)

Then we added the pipe cleaner for the handle of the basket!

First I got the papers ready. I cut half circles for the basket part- I cut these out of cardboard. Then I drew out the eggs and bunny to put in the basket. Then we cut strips of paper for the "basket" (weave). Older kids can help cut the strips. Also- with older children, you can show them how to "weave" the strips on their basket.
Then I gathered everything we needed. Besides the paper stuff that I already had together, I got pipe cleaners, markers, glitter glue, paint brushes, and the glue- which I colored with brown paint. I put the glue/paint in a bigger shallow dish.
I let the kid paint the glue/paint onto their baskets. And then start adding the paper strips (weave). You have to sort of hurry with this step, before the glue/paint dries.
After they put the strips on, we decorated it a little more with the glitter glue!
Then, they started coloring their bunny and eggs.
Then we cut them out, and glued them onto the basket. (You can also glue them to the back, so it looks like they are in the basket- but I made it simple for them to do!)
Then we added the pipe cleaner for the handle of the basket!
Tuesday, April 19, 2011
Easter Fun
Today, we did two crafts. There are just so many things to do around holiday times, that I like to get them all in!
The first one we did was bunny Ear headbands. First I collected everything we needed. I just had the kids color the ears, so the younger ones could do it too, but you can do anything!
I needed 2 bunny ears per child- I cut these out of cardboard, so they will stand up- if you use cardboard the possibilities are endless with how you decorate them! We were coloring, so I got the markers. Then the stapler, and the bands- which I made out of construction paper, fit to each child's head! We also had some Easter stickers for the head band!

Then I let the kids color on their ears!


(see even the younger ones can do it!)
After they were done, we put the stickers on their head bands, and stapled the ears on!


The next craft was an Easter Egg. Again, you could do this with any art supplies- collage stuff, crayons, glitter, paint etc. We used "special paint" so it would be shiny. I mixed some liquid tempra paint with white craft glue. It will dry with a 3-D type image to it, and be nice and shiny!
Before I mixed the paint I cut big egg shapes out of cardboard- use cardboard because the kids need to put lots on to make it stand out!

Then have the children paint on the paint mixture. Have them try painting it, dripping it and even swirling it! See what they come up with!
(please note, they will take a while to dry!)
The first one we did was bunny Ear headbands. First I collected everything we needed. I just had the kids color the ears, so the younger ones could do it too, but you can do anything!
I needed 2 bunny ears per child- I cut these out of cardboard, so they will stand up- if you use cardboard the possibilities are endless with how you decorate them! We were coloring, so I got the markers. Then the stapler, and the bands- which I made out of construction paper, fit to each child's head! We also had some Easter stickers for the head band!
Then I let the kids color on their ears!
(see even the younger ones can do it!)
After they were done, we put the stickers on their head bands, and stapled the ears on!
The next craft was an Easter Egg. Again, you could do this with any art supplies- collage stuff, crayons, glitter, paint etc. We used "special paint" so it would be shiny. I mixed some liquid tempra paint with white craft glue. It will dry with a 3-D type image to it, and be nice and shiny!
Before I mixed the paint I cut big egg shapes out of cardboard- use cardboard because the kids need to put lots on to make it stand out!
Then have the children paint on the paint mixture. Have them try painting it, dripping it and even swirling it! See what they come up with!
(please note, they will take a while to dry!)
Subscribe to:
Posts (Atom)